


3 Little Technique Improvements for Fast Jump Rope Results
Today I want to discuss 3 quick and simple fixes that will help you improve your jump rope technique.
One of the biggest things that hold jump ropers back in further skill development is simply not analyzing their own form and identifying the areas that are causing the problems.
Whenever I begin to trip up, I like to jump rope in front of a mirror so I can start critiquing my own form and technique until I identify where it is breaking down so I can make the proper fix.Before we Begin...
Before you get into the common jump rope errors, I just wanted to let you know that we recently published an amazing new guide for jump rope beginners. Check it out here:
Learn How to Jump Rope: The Complete Beginner's Guide to Jump Rope Training
Top 3 Jump Rope Technique Errors Revealed
From my experience in working with hundreds of jumpers at various jump rope clinics, I have identified 3 major errors in 3 different areas as follows:
- Proper rope rotation
- Arm positioning
- Jump mechanics
Let’s dive into each of these so you know what to look for in determining whether you are on the right track or if you need to pay extra attention to any of these areas.
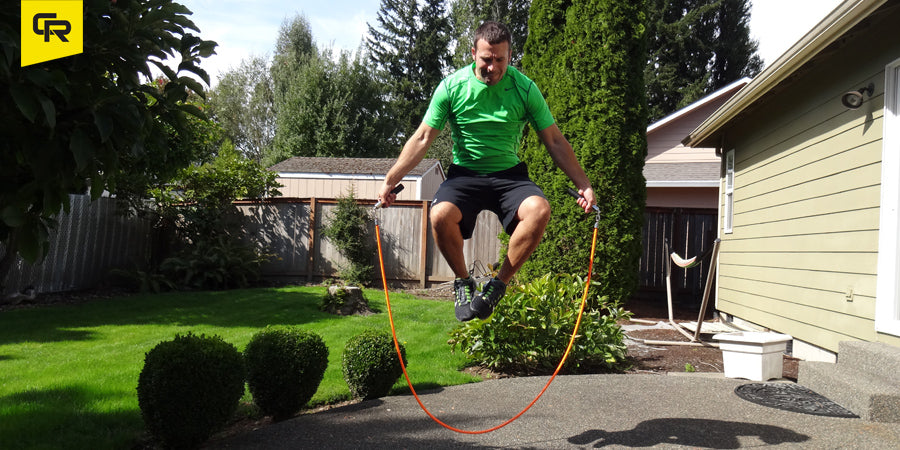
1. Proper Rope Rotation
Many people have developed improper rope rotational technique through the use of poor quality jump ropes and many times habits they performed with the jump rope as a kid.
This most often shows up as a lot of arm movement. Take a look at the photos below.


On the image on the left, I demonstrate improper rope rotational technique. On the image on the right, I demonstrate good rotational technique.
On the left, you can immediately identify poor technique because my arms are bent at nearly a 90 degree angle. Essentially, I'm rotating the rope by pivoting at the elbow joint.
On the right, my arms are nearly straight and my palms are facing forward. This means that my wrists are the primary rotation drivers. This is important because it allows me to be more efficient with my turns which further allows me to pick up speed.
Conclusion: Using small circles with the wrist to rotate your rope will produce far better results and help you up your tempo for more effective workouts.
Last week we posted a video regarding proper rope rotation. If you missed it, you can watch it here.
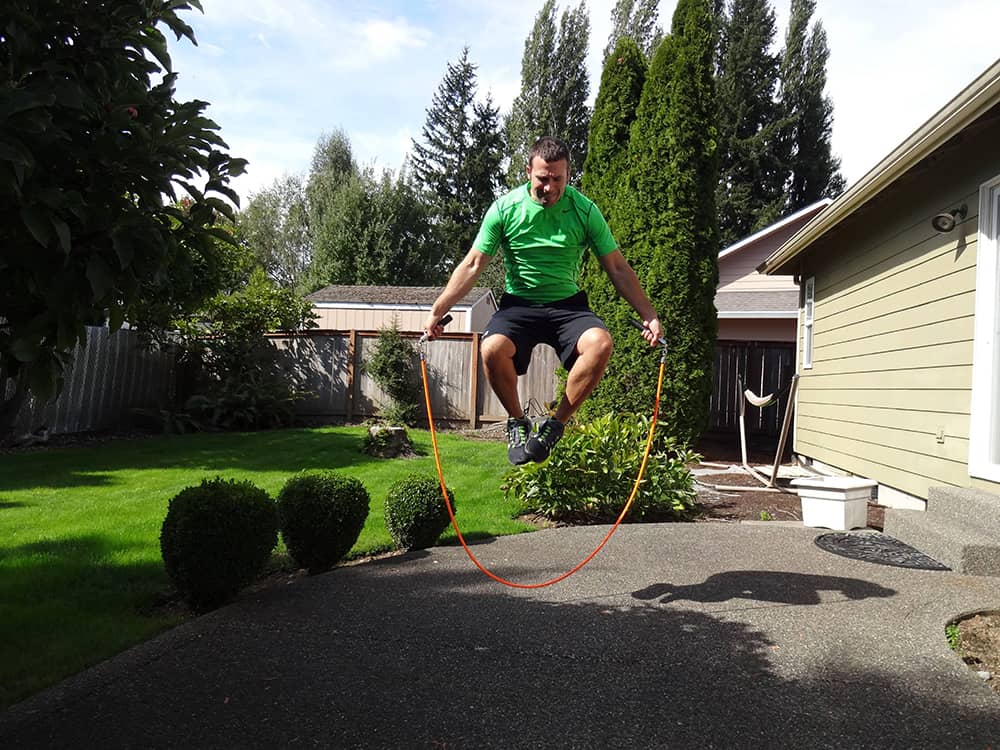
2. Arm Positioning
Proper arm positioning is equally important and can set you up for proper rope rotation.
The most important aspect for arm positioning is maintaining a consistent position while you are jumping and being symmetrical from one side to the other. Below is a picture showing poor arm positioning.

As you can see there are a number of asymmetrical problems occurring here.
Point 4 shows how one hand is slightly lower than the other hand.
Points 2 and 3 show how one arm is more bent and tucked tight to the body while the other arm is more extended and raised away from the body.
Point 1 shows how the asymmetries affect the rope as it rotates around the body.
Notice how the loop of the rope is off center and to the right my body. This is due to the hand on that side being lower and the arm being more extended from the body.
Now take a look back up at the top right image in this article. This is what good symmetry looks like.
Conclusion: Maintain symmetry from one side to the other as well as from top to bottom for a more consistent and centered rope path to eliminate trip ups.
3. Proper Jump Mechanics
Last but not least, let's take a look at proper jump mechanics.
One of the most common mistakes I see jumper make is called the tuck jump.
The image on the left demonstrates what this poor technique looks like:
Maintaining nearly straight legs with the toes left hanging towards the ground. This is what I call ‘jump follow through’. You are pushing through the balls of your feet only utilizing your calves and ankles to propel you up into the air.
Keep in mind that you only need to jump 1-3 inches off the ground to clear your rope. The faster you rotate your rope the lower you need to jump in order to get back on the ground for your next consecutive jump.
Conclusion: Very slight bend in the knee, jump through lower leg (calves and ankles), and jump low so you can regain ground contact quickly after rope passes beneath you for next jump.
As G.I. Joe always said, “Knowing is half the battle”.
You must know where the problem lies before you can fix it so identify your weaknesses and follow up by implementing any of these technique fixes into your form.
Do this and I know you will be more successful in developing your jump rope abilities.
Good luck!
Bonus: how often are you jumping rope? Here's how often we recommend you jump rope each week. Enjoy!
Related Articles


